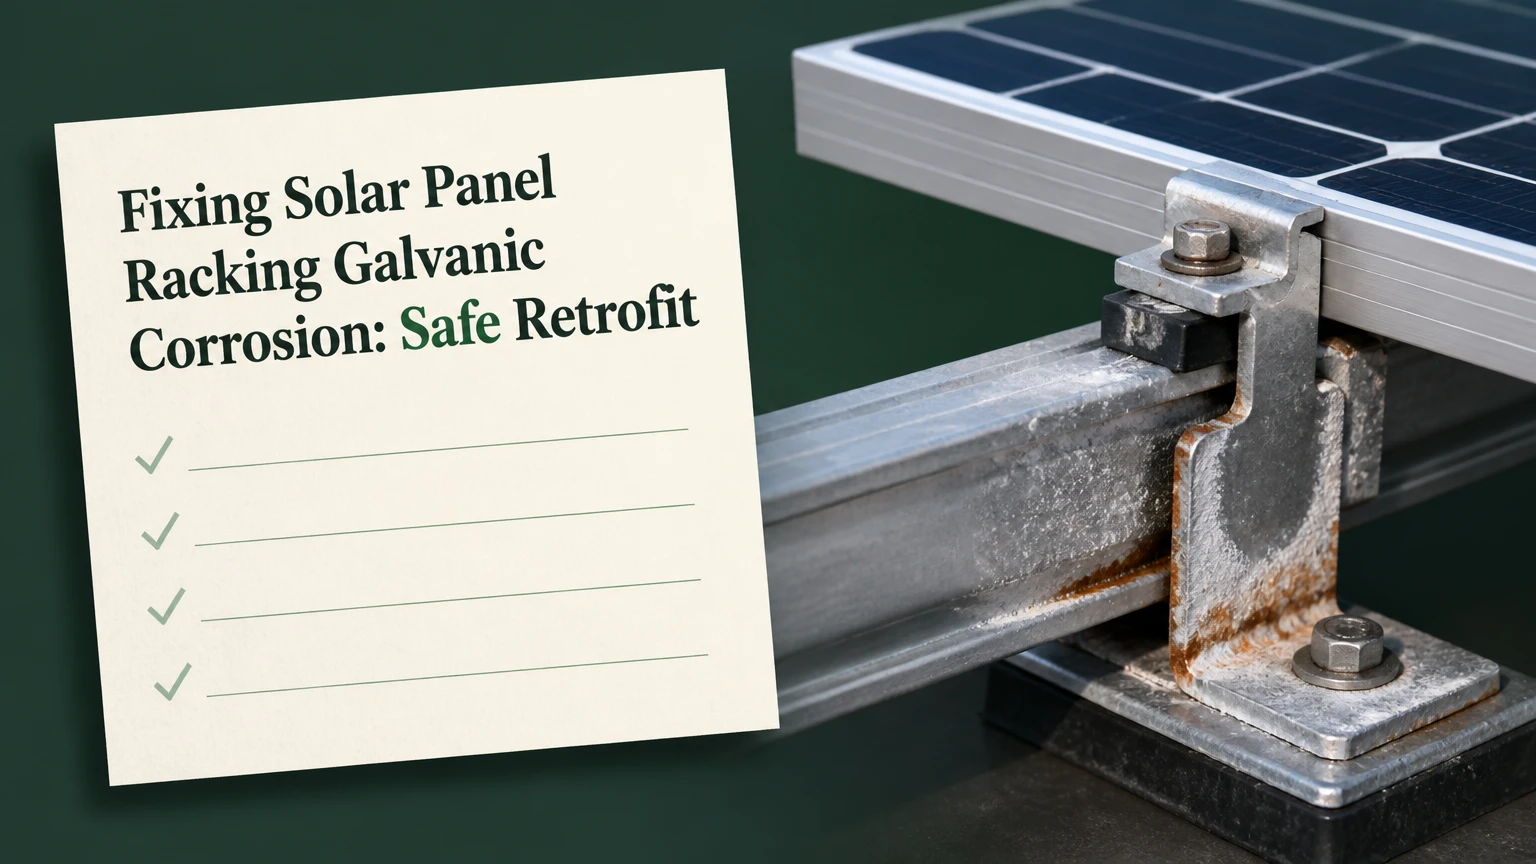
Fixing Solar Panel Racking Galvanic Corrosion requires separating dissimilar metals, restoring damaged surfaces, and preserving a code-compliant bonding path. Inspect aluminum rails, steel brackets, fasteners, and drainage before choosing EPDM, HDPE, or approved isolation hardware. Replace any rail or bracket with deep pitting, reduced section, elongated holes, or compromised load capacity.
Key Facts / At a Glance
Aluminum usually becomes the anodic metal when coupled to carbon steel or stainless steel in a wet, conductive joint.
Galvanic corrosion requires an anode, cathode, electrical contact, and electrolyte; removing any one condition interrupts the galvanic circuit.
A nylon washer or dielectric grease alone cannot prove that a solar racking system remains mechanically sound or electrically bonded.
A multimeter reading between aluminum and steel is not a reliable pass-or-fail galvanic-corrosion threshold.
Corrosion repair must address trapped water and salt deposits, not only visible white powder.
Dedicated listed bonding hardware must replace any structural connection that isolation materials electrically interrupt.
Why Does Aluminum Corrode Against Steel?
Aluminum corrodes preferentially against steel when the metals touch and a conductive moisture film connects their exposed surfaces. Aluminum gives up electrons as the anode, while steel, stainless steel, or another more noble conductor supports the cathodic reaction. The severity depends on alloy, surface area, chloride concentration, joint geometry, coating condition, and wet time.
AMPP, formerly NACE International, defines corrosion as “the deterioration of a material, usually a metal, that results from a chemical or electrochemical reaction with its environment.” Galvanic corrosion is one electrochemical form, not the only corrosion mechanism found in PV hardware. Crevice corrosion, pitting, coating breakdown, atmospheric corrosion, and stress corrosion can occur simultaneously.
A solar array creates favorable conditions because rails and brackets form narrow joints that collect rainwater, dew, condensation, bird droppings, cleaning chemicals, and airborne salt. A small exposed aluminum area coupled to a much larger stainless steel fastener or steel support can corrode rapidly because the anodic current concentrates at the aluminum edge.
The four conditions required for a galvanic cell
| Condition | Solar example | What removes or reduces it |
|---|---|---|
| Anode | Aluminum rail or module frame | Replace damaged aluminum or change the material pair |
| Cathode | Stainless bolt or galvanized steel bracket | Use compatible hardware and protective coatings |
| Electrical path | Bolt, bracket, rail, or bonding jumper | Install a qualified nonconductive barrier where permitted |
| Electrolyte | Rain, dew, condensation, or saltwater film | Improve drainage, sealing, ventilation, and cleaning |
The zinc coating on hot-dip galvanized steel adds another variable. Zinc is more active than steel and can provide sacrificial protection to exposed steel, but a damaged zinc surface can still couple to aluminum. Galvanizing does not make every aluminum-to-steel detail automatically compatible.
How Can You Tell Cosmetic Oxidation From Structural Damage?
White powder on an aluminum rail indicates aluminum corrosion products, but appearance alone cannot establish remaining strength. Cosmetic chalking on an intact anodized surface differs from deep pitting around a fastener hole, where section loss can reduce clamp force and load capacity.
Clean only a small test area first. A plastic scraper and nylon brush reveal the surface without removing sound aluminum. Avoid aggressive grinding because it can enlarge pits, reduce rail thickness, remove anodizing, and make later inspection less reliable.
| Finding | Likely condition | Required response |
|---|---|---|
| Thin white film, no pits | Surface oxidation | Clean, photograph, and monitor |
| Powder under a washer | Active crevice corrosion | Disassemble, dry, isolate, and inspect |
| Pits under 0.5 mm deep | Early localized attack | Measure, treat, and inspect at six-month intervals |
| Pits over 1 mm deep | Potential section loss | Obtain manufacturer or engineer assessment |
| Elongated bolt hole | Mechanical and corrosion damage | Stop loading and replace the affected rail |
| Cracked flange or distorted bracket | Structural failure risk | Shore the array and replace the component |
| Rust staining from carbon steel | Coating breach or steel corrosion | Inspect the entire joint and drainage path |
| Black or green deposit | Possible copper contamination | Remove contamination and investigate hardware |
A practical rule is simple: replace a component when corrosion has changed its geometry, hole dimensions, fastener engagement, flange thickness, or connection bearing surface. Do not restore load-bearing aluminum with primer alone.
Before You Start: Tools, Materials, and Safety
A single residential joint normally takes 30-90 minutes to inspect and 1-3 hours to repair, depending on access, seized hardware, and whether the rail must be replaced. Roof work, module removal, structural shoring, and electrical isolation require qualified personnel.
| Item | Typical quantity per joint | Specification or purpose |
|---|---|---|
| Plastic scraper | 1 | Removes loose corrosion products |
| Nylon abrasive pad | 1-2 | Cleans aluminum without aggressive grinding |
| Digital caliper | 1 | Measures rail, pit, and hole damage |
| Torque wrench | 1 | Applies the racking manufacturer’s torque |
| EPDM or HDPE isolator | 1 per interface | Full-area separation from steel |
| Nylon sleeve or shoulder washer | 1 per bolt | Prevents bolt-shank contact |
| Stainless replacement bolt | As specified | Use the racking manufacturer’s listed grade |
| Approved bonding hardware | As designed | Maintains electrical continuity |
| Corrosion-compatible compound | Small amount | Reduces galling and moisture entry |
| Replacement rail or bracket | As required | Used when section loss is structural |
Before loosening a roof-mounted connection, confirm the module manufacturer’s removal instructions, the racking installation manual, local electrical requirements, and the roof warranty conditions. A racking bolt can carry mechanical load, provide bonding, or both. Isolation changes that function.
Step 1: Map the Metal Pair and Moisture Path
Record every metal touching the joint before removing anything. Identify the aluminum alloy or rail system, galvanized or bare carbon steel, stainless grade if marked, coating type, washers, nuts, grounding hardware, and any copper conductor.
Photograph the joint from above and below. Mark where water enters, where it drains, and whether the barrier is continuous around the bolt hole. A flat gasket that ends short of the bracket edge can leave a narrow capillary path, while a compressed washer can create a concealed metal bridge.
You will know this step is complete when the assembly drawing or photographs show each contact interface and every bonding path. The common mistake is treating the visible bolt head as the entire connection; corrosion often begins beneath the bracket or inside a closed rail channel.
Step 2: De-energize and support the array
Follow the system shutdown procedure and keep the modules mechanically supported before removing a structural connection. Photovoltaic modules can remain electrically energized in daylight even after an inverter is switched off, and a partially released rail can shift under wind or module weight.
Use fall protection and do not walk on modules. For a ground-mount array, install temporary bracing where the racking manufacturer requires it. For a roof array, never remove several adjacent rail-to-attachment connections at once unless an engineer or the system manufacturer has approved the sequence.
The success checkpoint is a stable array with no unexpected movement, cable tension, or loss of clamp engagement. The common mistake is beginning with the most corroded bolt while the connection is still carrying unplanned load.
Step 3: Disassemble and inspect the joint
Remove the fastener with the correct socket and back up the nut to avoid twisting the rail or bracket. If stainless threads gall, stop rather than applying uncontrolled heat near modules, roofing membranes, sealants, or wiring. Cut the fastener only under a documented repair procedure.
Separate the metals far enough to inspect both mating faces. Measure pit depth, rail thickness, bolt-hole diameter, and any loss of bracket section. A wire brush can remove loose oxide, but it cannot reveal corrosion hidden beneath a washer unless the joint is opened.
You will know the joint is repairable when the rail remains within the manufacturer’s dimensional limits and the bracket has no cracks, distortion, or excessive hole enlargement. The common mistake is reinstalling a pitted rail because the remaining surface looks clean after brushing.
Step 4: Clean, dry, and protect sound metal
Remove loose oxide, dirt, chloride deposits, and failed coating with nonmetallic tools or the method specified by the racking manufacturer. Rinse only when the assembly can be fully dried and the cleaning method will not drive water into the roof, module frame, or electrical enclosure.
Do not use copper brushes or copper-based compounds on aluminum. Copper particles can create additional dissimilar-metal cells. Do not apply chromate conversion products, including Alodine, without reviewing the current safety data sheet, disposal requirements, and manufacturer approval; many formulations contain hazardous chemicals and are not a substitute for lost structural material.
Apply a manufacturer-approved touch-up or corrosion-control coating only to sound, prepared surfaces. Keep coatings away from bonding contact points unless the bonding hardware is specifically designed to penetrate or bypass the coating.
The success checkpoint is a clean, dry, dimensionally sound interface with no loose oxide beneath the new barrier. The common mistake is sealing wet salt residue inside the joint, which preserves the electrolyte and accelerates hidden corrosion.
Step 5: Install a continuous isolation barrier
Choose an isolator that covers the entire aluminum-to-steel interface and remains stable under compression, temperature cycling, ultraviolet exposure, and water absorption. EPDM is common for exterior gaskets; HDPE, acetal, and purpose-designed polymer shoulder washers may suit other geometries.
The barrier must isolate the bolt shank, washer face, bracket edge, and any corner that could contact after thermal movement. A thin paint film is not a dependable structural isolator because tightening, abrasion, and movement can expose metal.
| Barrier | Typical exterior use | Strengths | Limitations |
|---|---|---|---|
| EPDM gasket | Roof and rail interfaces | UV resistance, flexible, weather sealing | Can creep if over-compressed |
| HDPE plate | Ground-mount brackets | Low water absorption, rigid separation | Requires accurate hole alignment |
| Nylon shoulder washer | Bolt shank and head | Electrical isolation in compact joints | Temperature and compression limits |
| Acetal washer | Precision hardware | Low friction and dimensional stability | Not suitable for every UV exposure |
| PTFE film | Low-load slip interface | Chemical resistance, low friction | Poor choice where load transfer depends on friction |
Install the barrier dry unless the racking manufacturer specifies a compatible sealant. You will know this step worked when a feeler gauge cannot find metal contact around the intended interface and the polymer is not buckled, split, or extruded into the bolt hole.
Step 6: Restore bonding and apply the correct compound
A dielectric compound can limit moisture entry and reduce thread galling, but it does not replace a physical barrier where two structural metals must be isolated. Many dielectric greases are electrically insulating; applying them to a bonding contact can increase resistance.
Use only the anti-seize type approved by the hardware or racking manufacturer. Copper anti-seize is a poor default around aluminum and galvanized steel. Zinc-based compounds may be compatible in some applications, but compatibility, torque correction, and bonding requirements must come from the system documentation.
Install listed bonding washers, bonding jumpers, grounding lugs, or other approved devices at the designated location. The bonding device may intentionally penetrate anodizing or coating, while the structural interface remains isolated.
The success checkpoint is a documented, low-resistance bonding path that does not depend on an accidental bolt-to-rail contact. The common mistake is inserting nylon washers everywhere and leaving the array electrically discontinuous.
Step 7: Torque, seal, and document the repair
Tighten the fastener to the racking manufacturer’s specified torque using the stated lubricant condition. Do not automatically reduce torque by 10-15% when installing a polymer washer; friction, clamp load, washer compression, and fastener grade vary by system, so an arbitrary reduction can loosen the joint.
If the manufacturer supplies no torque value, obtain engineering guidance rather than copying a value from a different rail system. Record fastener grade, compound, washer type, torque, date, photographs, and bonding test results.
Seal only where the design requires it. A sealant bead that blocks a weep path can trap water, while a barrier that prevents drainage turns intermittent wetting into prolonged immersion.
The final checkpoint is a tight, aligned connection with an open drainage route, no crushed isolator, and a verified bonding path. Reinspect after the first major rain event and again within six months.
Which Metals and Fasteners Are Compatible?
No metal combination is universally safe. Compatibility depends on the galvanic relationship, area ratio, electrolyte, coating damage, joint design, and whether the fastener is allowed to contact the aluminum.
| Assembly choice | Typical material | Relative corrosion risk | Best application |
|---|---|---|---|
| Aluminum rail and aluminum bracket | 6000-series aluminum | Low when drainage is good | Roof and light ground-mount systems |
| Aluminum rail and 304 stainless bolt | Stainless steel fastener | Moderate to high in chloride joints | Use with listed isolation and bonding |
| Aluminum rail and 316 stainless bolt | Marine-grade stainless | Lower fastener corrosion, aluminum still vulnerable | Coastal systems with full isolation |
| Aluminum rail and HDG steel bracket | Zinc-coated carbon steel | Moderate, coating-dependent | Engineered ground mounts |
| Aluminum rail and bare carbon steel | Uncoated steel | High | Avoid in wet exterior joints |
| Aluminum rail and copper conductor | Copper | High at exposed contact | Use approved lugs and separation |
| Aluminum rail and fiberglass component | Glass-fiber polymer | No galvanic metal cell | Specialty structural designs |
Aluminum versus galvanized steel racking
Aluminum racking is lighter and naturally corrosion-resistant in many atmospheres, while galvanized steel provides higher stiffness and large structural capacity at ground-mount scale. Galvanized steel is not a complete solution when its zinc coating is scratched, when water contacts exposed steel, or when the bracket creates a wet aluminum interface.
The better selection depends on loading and environment. Aluminum often simplifies rooftop handling and avoids a large steel cathode. Galvanized steel can be economical for utility and ground-mount structures, provided the design controls drainage, coating damage, and dissimilar-metal contact.
| Decision factor | Aluminum racking | Hot-dip galvanized steel | 316 stainless hardware |
|---|---|---|---|
| Typical rooftop handling | 2-4 kg per 3 m rail | 8-15 kg per 3 m member | Fastener-only component |
| Relative stiffness | Lower than steel | Higher than aluminum | High fastener strength |
| Typical material cost | $15-$35 per rail | $20-$55 per member | $1-$6 per fastener |
| Coastal exposure | Good with drainage | Coating inspection required | Better fastener resistance |
| Galvanic concern | Becomes anode near noble metals | Zinc coating can be consumed | Can accelerate aluminum attack |
| Installation requirement | Isolation at steel interfaces | Repair damaged zinc coating | Anti-galling and isolation |
| Replacement difficulty | Rail sections often modular | Heavier structural replacement | Usually simple fastener swap |
For most rooftop retrofits, an aluminum rail with a purpose-designed stainless fastener, a continuous polymer isolator, and dedicated bonding hardware is more predictable than an improvised aluminum-to-steel connection.
Which Barrier Material Should You Choose?
EPDM is the usual first choice for flexible exterior gaskets, while HDPE suits rigid plates between steel brackets and aluminum rails. Nylon or acetal shoulder washers isolate bolt shanks, but a bolt-head washer alone cannot isolate a broad bracket face.
Select the barrier from the manufacturer’s load, temperature, UV, water, and chemical requirements. Do not infer suitability from a material name alone. A polymer can be electrically nonconductive and still fail through creep, tearing, moisture absorption, or cold-flow under clamp load.
| Environment | Preferred barrier approach | Minimum design concern | Inspection interval |
|---|---|---|---|
| Dry inland roof | EPDM gasket and shoulder washer | UV and compression set | 12 months |
| Humid subtropical roof | EPDM with open drainage | Long wet time and mold | 6-12 months |
| Coastal roof | Thick EPDM or HDPE plate | Chlorides and salt retention | 3-6 months |
| Snow and freeze-thaw | HDPE or rated EPDM | Ice expansion and movement | Before and after winter |
| Industrial atmosphere | Manufacturer-approved polymer | Acid or alkaline deposits | 3-6 months |
What Can Anti-Seize, Grease, and Coatings Actually Do?
Anti-seize reduces thread friction and stainless-steel galling; it does not reliably stop galvanic corrosion across a loaded structural interface. Dielectric grease can displace moisture at a sealed connector or contact, but it cannot restore a damaged rail or guarantee electrical continuity.
Coatings work best when they are specified for the substrate and protected from abrasion. A coating on aluminum can reduce exposure, while a zinc coating on steel provides sacrificial protection until the coating is consumed or damaged. Neither coating eliminates the need for drainage and correct fastener design.
Use a compound only after deciding whether the joint must conduct electrically. A compound that insulates a structural contact can undermine bonding, and a conductive compound can create an unintended current path between dissimilar metals.
Does a Multimeter Prove Active Galvanic Corrosion?
A voltage reading between aluminum and steel does not provide a universal galvanic-corrosion threshold. A digital multimeter may measure induced voltage, grounding differences, polarization, contact resistance, inverter noise, or a temporary moisture condition, so a 150 mV reading cannot by itself diagnose failure.
Galvanic corrosion assessment compares materials and exposure through recognized electrochemical testing, visual inspection, material measurement, and engineering evaluation. The galvanic series is environment-specific, and values change with electrolyte composition, temperature, oxygen availability, and surface condition.
Use electrical testing for the bonding question, not as a standalone corrosion test. A qualified technician can test continuity and resistance using the system’s grounding requirements and approved test method. The repair record should identify the bonding device, test point, instrument, and result.
This distinction corrects a common field error: treating 0.15 V as a universal danger line. No broadly valid solar-racking rule says every aluminum-to-steel measurement above that number requires replacement.
When Is Corrosion Structural?
Corrosion is structural when it reduces the section, enlarges a fastener hole, cracks a flange, weakens a splice, compromises a bolt, or prevents the connection from achieving its designed clamp load. White powder without measurable damage may be cosmetic, but corrosion under a clamp can remain hidden until disassembly.
Have the racking manufacturer or a structural engineer review damage near rail splices, module clamps, roof attachments, wind-bracing connections, and ground-mount posts. Array loads include wind uplift, snow, thermal movement, and module weight; visual judgment cannot establish residual capacity.
Expert inspection rules
- Inspect the cathode’s edge, not only the aluminum surface. A large stainless washer can concentrate attack at the aluminum perimeter, where pitting often begins.
- Treat drainage as part of corrosion control. A barrier that blocks a weep path may increase exposure time even when it electrically separates the metals.
- Replace failed geometry, not merely failed appearance. Primer can cover discoloration, but it cannot recover lost aluminum thickness or an elongated bolt hole.
Typical Repair Cost and Time
A small accessible rooftop repair typically costs $75-$250 in materials and labor for one to three joints, while rail replacement or module removal can raise the project total to $300-$1,500 or more. These are typical contractor ranges, not published universal prices; roof access, region, permits, lift equipment, and replacement hardware produce wide variation.
| Repair scope | Typical time | Typical direct materials | Likely labor complexity |
|---|---|---|---|
| Inspect and clean one joint | 30-60 minutes | $5-$25 | Low |
| Add gasket and shoulder washer | 1-2 hours | $10-$40 | Moderate |
| Replace seized fasteners | 1-3 hours | $15-$75 | Moderate |
| Replace one aluminum rail | 3-6 hours | $75-$350 | High |
| Replace damaged bracket and bonding | 2-5 hours | $40-$200 | Moderate |
| Coastal multi-joint retrofit | 1-2 days | $200-$1,000 | High |
The lowest-cost repair is worthwhile only when the rail and bracket remain within design limits. Delaying replacement after section loss can convert a gasket retrofit into a full array removal.
Marine and High-Salt Environments
Coastal solar arrays require shorter inspection intervals, better drainage, and more complete isolation than inland arrays because chloride deposits keep moisture films conductive. Salt can remain beneath washers and inside rail channels after the visible surface dries.
Use the racking manufacturer’s marine-rated components, 316 stainless hardware where specified, continuous polymer interfaces, sealed or protected cut ends, and dedicated bonding hardware. Avoid improvised sacrificial zinc pieces unless an engineer has designed the electrochemical system; a small zinc attachment can create new area-ratio and drainage problems.
For severe exposure, an all-aluminum structural design may reduce dissimilar-metal interfaces, but it still requires compatible stainless fasteners, correct bonding, and protection from copper contact. Fiberglass-reinforced polymer can remove a galvanic metal pair in specialized structures, although its stiffness, fire rating, creep, and attachment details require separate engineering.
Common Repair Mistakes and Their Fixes
| Mistake | Why it fails | Corrective action |
|---|---|---|
| Using copper anti-seize | Copper can accelerate aluminum attack | Use manufacturer-approved compound |
| Installing only a nylon washer | Bracket face or bolt shank may still touch | Isolate the full interface and shank |
| Crushing the gasket | Compression can expose metal or block drainage | Follow specified clamp load and geometry |
| Painting over corrosion | Coating hides section loss | Clean, measure, then replace if damaged |
| Blocking a weep hole | Trapped water prolongs electrolyte exposure | Preserve the designed drainage path |
| Bonding through a random bolt | Contact may loosen or corrode | Install listed bonding hardware |
| Treating stainless as corrosion-proof | Stainless can remain cathodic while aluminum pits | Use isolation and inspect aluminum |
| Relying on a 0.15 V reading | Field voltage is not a universal threshold | Test bonding separately and inspect metal |
The Bottom Line
Fixing Solar Panel Racking Galvanic Corrosion starts with identifying the complete metal pair, moisture path, and electrical bonding function. Clean and measure the joint, replace structurally damaged components, install a continuous UV-rated isolator, preserve drainage, and restore bonding with listed hardware. Do not use grease, primer, or a multimeter threshold as a substitute for engineering judgment.
For inland rooftop arrays, an approved EPDM gasket with a nylon shoulder washer is often the simplest retrofit. Coastal, heavily pitted, distorted, or load-critical assemblies need manufacturer or engineering review before reassembly.
Frequently Asked Questions
Can stainless steel touch an aluminum solar frame?
Stainless steel can be used near an aluminum frame when the racking system specifies the combination and controls the interface. Direct wet contact can accelerate localized aluminum corrosion, especially with 316 stainless in chloride exposure. Use the specified isolation washer, shoulder sleeve, gasket, and bonding hardware rather than relying on stainless steel’s corrosion resistance.
Should I use galvanized or stainless bolts with aluminum racking?
Use the fastener grade listed by the racking manufacturer, not a universal substitute. Stainless steel offers strong atmospheric resistance but can promote aluminum attack if the joint remains wet and electrically connected. Galvanized hardware may reduce the potential difference in some designs, but damaged zinc coatings and trapped water create separate failure risks.
Can I stop galvanic corrosion without removing the solar panels?
Minor, accessible corrosion may be isolated without full module removal if the connection is not load-critical and the manufacturer permits the procedure. Hidden corrosion beneath a rail, module clamp, roof attachment, or splice usually requires controlled disassembly. Never loosen a structural connection without supporting the array and preserving its bonding path.
How often should solar racking be inspected for corrosion?
Inspect inland residential racking at least annually and inspect coastal or industrial arrays every three to six months. Perform an additional inspection after major storms, flooding, salt-spray events, or roof work. Open representative joints during a detailed assessment because surface inspection cannot reveal pitting beneath washers.
Are sacrificial zinc anodes a good solar-racking repair?
Sacrificial zinc anodes are rarely the best retrofit for ordinary solar racking. An effective anode requires designed electrical continuity, sufficient mass, suitable electrolyte exposure, and controlled area ratios. A randomly attached zinc piece can corrode unevenly, trap water, and complicate bonding. Physical isolation and drainage are usually more predictable.
Does galvanic corrosion affect solar panel output?
Galvanic corrosion usually affects mechanical integrity and electrical bonding before it directly reduces module output. Output can decline indirectly when corrosion loosens clamps, damages wiring, increases grounding faults, or allows moisture into connectors and junction boxes. Inspect the electrical system separately from the structural racking.
What should I do if the rail has deep pitting?
Stop tightening the joint and obtain the rail manufacturer’s replacement criteria or a structural assessment. Deep pits, elongated holes, cracked flanges, section loss, and distorted splices can reduce load capacity even when the rail appears stable. Replace the affected rail or bracket when its dimensions fall outside the approved limits.
How do I prevent future aluminum and steel reactions?
Prevent future reactions by using compatible materials, continuous isolation, protected fasteners, open drainage, clean cut ends, and dedicated bonding hardware. Schedule inspections according to exposure, with shorter intervals for salt and industrial pollution. Record the installed materials and torque so later maintenance does not recreate direct metal contact.